20 September 2011

Zwiebelkuchen or onion tart (plus how to chop an onion)

The longer I live overseas, the more I continue to learn and am fascinated about certain things. For example, how important seasonality of fruits and vegetables is around here in Germany.  There are things I knew had seasons like strawberries or tomatoes or corn.  I had no idea that onions had a season.  And not only that, but how thoroughly it is embraced.
Zwiebelkuchen and Neuerwein is currently on the menus of many restaurants around here.  Zwiebelkuchen is basically a savory tart, kind of like a quiche without cheese and with onions.  Lots of them.  It is commonly paired with Neuerwein, or new wine, the semi-fermented wine of this year's grape harvest.  It can vary widely in flavor and alcohol content: the sweeter it is, the less alcohol it has, and vice versa. Because I love this paring so much, I made it my mission to find a recipe and make it for myself.

I think I may have found a winner.  I had to borrow from several places, combine a few recipes, and go to many restaurants to sample to see what I liked best (tough job, I know).  But all that blood, sweat and tears (ha!) has paid off.

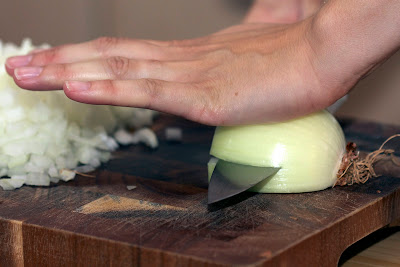
Because this recipe involves 1 1/2 lbs of onions I figured I would also include a little instructional guide to chopping them up.  So first, I'll get started with the "how-to".  It is best to use a fairly big knife for this task, I like using my 9" chef's knife.  I've included pics, because sometimes it's a little hard to describe.

To start, cut the onion in half through the root and stem ends.
Working with one of the halves, place it flat side down and slice off the stem end (not the end with the little fuzzy brown stuff, that's the root).  Leaving this end in place will help keep the onion together as you chop it.

Now, peel the papery outside off of the onion.

Next, with your knife parallel to the cutting board and starting near the bottom of the onion, slice through the onion almost up to the root end, but not all the way.  Repeat 2 or 3 times depending on how small you would like your onion chopped.
 

The next step is to cut vertically through the onion.  With your knife perpendicular to the cutting board and the tip of the knife pointing toward the root end of the onion, begin to slice vertically starting from one side and working across the onion to the other.  You may lose a few pieces on either side, but that's ok.
Finally you'll make slices across the ones you've just made working from the end where the stem was to the root end. And there you go, you're done.  The thing I haven't figured out yet is how to avoid crying while chopping.  Any hints?  Please let me know!

Now for the rest of the recipe...I should add, I made a shortbread crust for this. If you have a better recipe, by all means use it.  If you don't have the time or inclination to make your own crust, I think a store-bought pie crust would also work.

Zwiebelkuchen (onion tart)
Crust adapted from Avoca Cafe cookbook
Filling adapted from Cooks Illustrated

Ingredients
For the crust:
8 oz plain flour (about 1 cup plus a heaping 3/4 cup)
5 oz butter (10 tbsp or 1 1/4 sticks), diced
1/2 tsp salt
2 egg yolks

For the filling:
2-4 slices bacon, depending how much bacon flavor you want.
vegetable oil, if needed
1 1/2 pounds onions (about 3 3"diameter onions), diced (yellow or white are fine, but not sweet onions)
1 sprig fresh thyme
3/4 teaspoon salt
2 large eggs
1/2 cup half-and-half
1/4 teaspoon ground black pepper
1 tsp caraway seeds, toasted

Directions
As a time-flow hint, you could start the crust, then while the crust is chilling or baking, or both, get started on the filling.

Make the crust.
Preheat oven to 350F/180C.  Sift the flour into a bowl and rub in the butter until the mixture resembles fine breadcrumbs.  Stir in the salt them mix to a dough with the egg yolks and a little cold water if necessary. 

Cover with plastic wrap. Put into the fridge to chill for 20-30 minutes.  After it has chilled, remove from the fridge and dump it into a pan with a removable bottom (you can use a regular pie pan, but it may be a little more difficult to get the Zwiebelkuchen out to serve).  You don't really need to be neat about this.  It's better if it isn't in one big blob.  Using your hands, spread out the dough to an even thickness in the pan and around the edges.  Place on cookie sheet and bake blind for 20 minutes (to bake blind, cover the pastry with parchment paper or foil and fill with dried beans or pie weights).   
Remove paper/foil and beans, return to oven for 5-10 more minutes or until very lightly browned.

Make the filling.
While crust is baking, cook bacon in 12-inch nonstick skillet over medium heat until browned and crisp, 8 to 10 minutes. Remove bacon slides from pan and let cool on a plate lined with a paper towel.  If it looks like you have about 2 tablespoons of bacon fat in the pan, fine, if less, add vegetable oil to make up any difference.

Add onions, salt, and thyme to skillet. Cover and cook until onions release liquid and start to wilt, about 10 minutes. Reduce heat to low and continue to cook, covered, until onions are very soft, about 20 minutes, stirring once or twice (if after 15 minutes onions look wet, remove lid and continue to cook another 5 minutes). Remove pan from heat and let onions cool 5 minutes.

Whisk eggs, half-and-half, pepper and caraway seeds together in large bowl. Remove thyme sprig from onions and discard. Stir onions into egg mixture until just incorporated. Spread onion mixture over baked crust and crumble bacon evenly on top.

Increase oven to 375F.  Return baking sheet with tart to oven and bake until center of tart feels firm to touch, 20 to 25 minutes. Cool on wire rack at least 10 minutes.
When ready to serve, remove tart pan ring (hint: place tart on a large can of tomatoes and the ring should just fall away with a little push), gently slide thin-bladed spatula between tart pan bottom and crust to loosen, then slide tart to serving plate. Cut into wedges and serve.


13 August 2011

Chicken Breasts with Tomatoes and Herbs

So I'm sure upon reading this post, my mom will be shocked that I'm sharing a recipe with tomatoes as one of the main ingredients. I am not a fan of tomatoes.  I would pick them out of spaghetti sauce as a child. The closest thing I would eat to tomatoes when I was little was ketchup and pizza sauce.  To this day, I'll still pick tomatoes out of a salad and give them to my husband.  Bruschetta with chopped tomatoes and fresh herbs--nope.  Caprese salad with fresh mozzarella--only the cheese, please.  Chunky salsa--chips dipped to absorb juice only, no chunks. 
 
I feel like, as an adult, I should be past this picking-stuff-out-of-my-salad phase.  Tomatoes are a grown-up food.  And good for you.  So why am I so averse to them?  I don't know.  But I made a decision a little while ago to make myself at least try recipes with fresh tomatoes.  I've come across some that have been OK. Some that the husband loved (read: chock full of tomatoes and little else).  But none that I have truly enjoyed.  Until I came across this recipe in this month's Bon Appetit.  I had to share it. The tomatoes are both sweet and a little sour, the butter adds a nice richness to it, and the herbs make it taste light and fresh. All together it makes for a tasty dish.  You only need a nice green salad to go along side.

BA has this great section in it called "Fast, Easy, Fresh", and that is exactly how I would describe this dish.  It is really simple.  All you do is mix some oregano and spices into soft butter, sautee up some chicken breasts in some of the butter, then char up some tomatoes in that same pan. And you're pretty much done.  Mom will be so proud, I'm eating my tomatoes!
Some notes on this recipe:
- Use a meat thermometer to measure the internal temperature of the chicken breasts to make sure they are done right, not too raw, not too dry. You're looking for a temp 150-155F.  Tenting them with foil after this point and letting them rest will increase the temperature and redistribute the juices back through the meat, keeping it moist.
- After you remove the chicken from the pan, toss the tomatoes right in on top of the pan juices and any bits from the chicken.  There is lots of flavor in what is left over and you don't want to lose it.  
- Get a good char on the tomatoes, again, another good source of flavor.  Once they get a little caramelized, that's when they start to get sweet.
Chicken Breasts with Tomatoes and Herbs
slightly adapted From Bon Appetit
Printable version
Ingredients
4 tablespoons (1/2 stick) unsalted butter, room temperature
2 garlic cloves, minced
1 tablespoon chopped fresh oregano
1 teaspoon sweet paprika
Kosher salt and freshly ground black pepper
4 skinless, boneless chicken breasts
4 cups mixed cherry tomatoes (1 1/2 lbs)
2 tablespoon chopped fresh flat-leaf parsley

1. Mash butter, garlic, oregano, and paprika in a small bowl to blend. Season to taste with salt and pepper.
 
2.  Add half of the oregano butter to a medium heavy skillet and melt over medium heat. Season chicken with salt and pepper. Add chicken to skillet, cover, and cook until no longer pink in center, or a thermometer reads 150-155F, about 5 minutes per side (depending on how big thick the chicken is). Transfer chicken to a plate. Tent chicken with foil to keep warm.
3. Increase heat to high. Add tomatoes to skillet and cook, stirring occasionally, until they begin to char and burst, about 5 minutes. Add remaining oregano butter to skillet. Crush tomatoes slightly to release juices; stir 1 minute. Season sauce to taste with salt and pepper. Spoon tomato sauce over chicken. Garnish with parsley.

31 July 2011

Salt-crusted Burgers with Lentil Hummus and Roasted Red Peppers

 
I'm back again.  I can't believe that I've gotten 2 posts completed in 2 weeks!  I'm so proud of myself.  And I'm totally loving getting back into sharing my kitchen with you guys again.
  
I've been doing a little experimenting in the past few months with lentils.  They're something I'm trying to use more of in my meals.  Lentils are a nutritional powerhouse with all sorts of fiber and protein in a calorie-light package. But I honestly had no idea how to use them before I saw this recipe.  I always thought of them as something you should eat, but not actually want to eat.  The more I research I've done, the more I'm finding out that I do actually want to eat them!  I'm looking forward to sharing more of my discoveries in future posts.
Lentils also make a great replacement for the carbs I feel like I'm not "allowed" to eat.  As I started eating less and less "white carbs" like bread and potatoes, I really missed the things that often go along with them, like hamburger buns and hamburgers.  I love love love a really good hamburger, but it seems weird to me to just eat a piece of cooked ground beef on a plate.  So when I came across this recipe, I realized that I had found exactly what I was looking for--I didn't even miss the bun.  Plus, it's super easy, and that is always good.  It's become a staple in my kitchen when I don't feel like cooking a big meal, but don't want to go out, either.  This burger, combined with the lentil hummus and roasted red peppers makes for a great balance of sweet and salty and a little garlicky.  You could even serve this with a nice salad if you would like to get a little more veggies into your day.

A few notes about this recipe:
-It actually calls for canned lentils, but I couldn't find that, so I just used dried lentils.  You'll want to cook them until very tender, it makes blending them much easier.
- If you're not familiar with tahini, it's a paste made out of sesame seeds.  It's also the other staple ingredient in traditional chickpea-based hummus.  You can find it in most grocery stores, but sometimes it's by the peanut butter and sometimes in the ethnic food section.  Here is one brand that I've been able to find easily.
- To prevent the burgers from cooking too fast on the outside and staying raw on the inside, let them sit out at room temperature for 30-60 minutes before cooking them.
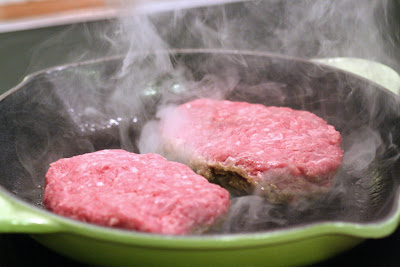
- What is really special about these burgers is the crust that forms on the bed of salt at the bottom of the pan.  The salt keeps the burgers slightly off the pan and lets the juices dissolve the salt.  It then forms a crunchy layer on the outside of the burger.  To make sure this happens, try to evenly distribute the salt in an area the same size as the burgers in the pan and place the formed burgers right on top of the salt.
- This recipe makes 2 8oz burgers.  Feel free to make 4 4oz burgers or however you want to do it.
- That also goes for making the hummus, if you want more garlic, add more garlic, or tahini, or lemon juice or whatever. When I make this, I just use the big spoons in my silver wear drawer and take 2 big scoops of tahini out of the jar.  I'm not much for exact measuring unless I'm baking, so don't stress too much.
- I haven't tried it, but I'm sure you could use ground turkey or chicken, but you may need to add a little fat to the pan to keep it from sticking.
Salt-crusted Burgers with Lentil Hummus and Roasted Red Peppers
adapted from: Jules at the Stone Soup
Printable Version

Ingredients:
1lb Ground Beef
½ cup Dried Lentils, rinsed
4 Tbsp Lemon Juice
2 cloves Garlic, peeled and smashed
4 Tbsp Tahini
1 Jar Roasted Red Peppers (10Oz)

Directions:
1. Put drained lentils into a saucepan, cover with about 2" of water and bring to a boil over high heat.  Turn the heat down to medium/med high and simmer for 20 minutes or until very tender. 

2. Meanwhile, heat a frying pan on a very high heat. Sprinkle a scant teaspoon of salt over the base of the pan, concentrating the salt under where you will place your burgers.
 
3.  Shape the beef into 2 burger patties (the thinner they are, the faster they will cook).   Cook burgers for 3-4 minutes on each side.  This will cook them to medium rare, leave on for longer if you want them a little less pink in the middle.
4.  While the burgers are cooking, blend lentils, lemon juice, garlic and tahini in a food processor or blender until smooth. Taste. Season.

5. When the burgers are cooked, remove from the pan to let rest and add the drained peppers. Cook peppers for a minute or until just heated through.

6. Serve burgers on a scoop of hummus and top with peppers.  Enjoy!

27 July 2011

My new favorite roast beef

WOW.  It has been a while since I have blogged. I really cannot believe it has been since February.  I'm kind of embarrassed I am about neglecting this place.  I really used to enjoy it, and then for some reason I stopped. I can't for sure say why.  I think it had a lot to do with me changing my whole way of eating in January.  I went on a diet.  Not the new-year's-resolution kind of diet, actually not a diet at all, but a "lifestyle change" as the experts like to say.  It kind of depressed me to not be able to eat the "good" stuff.  Like bread and potatoes and pasta and fruit and sugar. And Butterbretzels (my friends in Germany know the goodness of these big soft pretzels that have the fat end slit lengthwise and filled with butter).  But after all was said and done, I lost 20 pounds in 3 months and that made it all worthwhile.  I fell off the wagon for a little while, but I'm back on it.  Back to eating the way my doctor recommended (and hopefully dropping the last 15 pounds).  And now with a little experience under my belt in cooking that way, I'm excited to start up my blog again with a renewed enthusiasm in sharing my new way of cooking--but don't worry, I'll still be sharing the occasional sugar-loaded treats.
This recipe for roast beef is one that I've had for a several years, and it has been a success every time. I've made it several times before and it's only recently occurred to me to share it with all of you!  This is great for Christmas or New Years or any time you feel the need to celebrate with a big, delicious meal.  Now, all that being said, it is also great for the holiday times/entertaining because it is easy and doesn't require you to stand around at the stove for the entire time your guests are there.  Just a short saute of the mushroom after the beef comes out of the oven, and you are ready to chow down.
A few notes on this recipe:
- The most important thing in this recipe is to use a meat thermometer. I can't stress that one enough.  A thermometer can make you look like an absolute genius in the kitchen.  For me, I have no idea when something like a roast (or any cut of meat, really) is done unless I have a thermometer.
- Horseradish.  It is AWESOME! Even better when you can get in fresh and grate it yourself.  If you don't know what it looks like, it's a root that is long and narrow.  You absolutely have to peel it before you use it. The one I used in the picture above was about 9" long and maybe 1" in diameter.  If you can't find fresh horseradish, used the prepared stuff.  But NOT the creamy sauce stuff that is used on sandwiches.  That won't have nearly enough flavor. The prepared stuff will be in the refrigerated section.
- The horseradish/garlic/salt/pepper crust that goes on top of the beef will look like it has burnt to a crisp in the oven, well before your beef is done.  Don't panic.  That's just how it looks, trust your thermometer.  Once the beef is done, serve a little of the crust with each slice of meat, it is wonderful.  The original recipe calls for 1/2 c of salt in the crust. I found that to be too much, I recommend using only 1/3c.
- I've listed some vegetables to roast up with the meat.  Use these as a guideline, add more if you have room in your pan.  I don't have a great roasting pan at the moment, so I only used what would actually fit in the pan.  They turn out wonderfully, and every time I make this, I wish I had more veggies.
- Let the meat rest.  I can't stress this enough.  The meat won't get cold while it sits out.  Just tent some foil over the top.  Resting it allows all the yummy juices to go back into the meat.  If you serve it straight out of the oven, when you carve it up, all the juices will end up on the cutting board, and not in the meat where it should be, making the meat taste dry.  The internal temperature will also continue to rise as you let it rest.  
- A nice green salad would also be great with this.

Enjoy...and if you decide to make this, let me know how it turns out!
Horseradish and Garlic Prime Rib with Roasted Vegetables and Sauteed Mushrooms
Prime Rib:
1 (3-rib) Prime Rib Beef Roast, about 6 pounds
5 Garlic Cloves, smashed, plus 2 heads garlic, halved
1/2 cup Grated Fresh Or Prepared Horseradish
1/3-1/2 cup Sea Salt
1/4 cup Freshly Ground Black Pepper
1/2 cup Extra-Virgin Olive Oil
2 Carrots, peeled and chopped
2 Parsnips
1 Red Onion, halved
Wild Mushrooms:
1 Tbsp Unsalted Butter
Extra-Virgin Olive Oil
2 pounds Assorted Mushrooms, such as cremini, oyster, shiitake, chanterelle, or white, trimmed and sliced
Leaves From 2 Fresh Thyme Sprigs
Sea Salt And Freshly Ground Black Pepper
1/2 cup dry red wine
1/2 cup Reserved Beef Broth (Drippings From Roast) Or Low-Sodium Canned Broth
1/2 cup Heavy Cream
1 Tbsp Minced Fresh Chives 

Directions:
Preheat the oven to 350℉.

Lay the beef in a large roasting pan with the bone side down. (The ribs act as a natural roasting rack.) 
In a small bowl mash together the garlic, horseradish, salt, pepper, and olive oil to make a paste. Massage the paste generously over the entire roast. 
  
Scatter the vegetables and halved garlic around the meat and drizzle them with a 2-count of oil.
 
Put the pan in the oven and roast the beef for about 1 ½ to 2 hours for medium-rare (or approximately 20 minutes per pound). Check the internal temperature of the roast in several places with an instant-read thermometer; it should register 125℉. for medium-rare. 

Remove the beef to a carving board and let it rest for 20 minutes. The internal temperature of the meat will continue to rise by about 10 degrees. Remove the vegetables and set aside. Pour the pan juices into a fat separator or small bowl and set aside to allow the fat and beef juices to separate. Pour off and discard the fat. You will use the tasty beef juices for the mushrooms.

Wild Mushrooms:
Place a clean skillet over medium heat. Add the butter and a 2-count drizzle of oil. When the butter starts to foam. add the mushrooms and thyme; and season with salt and pepper. Stir everything together for a few minutes. Add the red wine, stirring to scrape up any stuck bits; then cook and stir to evaporate the alcohol. When the wine is almost all gone, add the reserved beef juices (or beef stock). Let the liquid cook down and then take it off the heat. Stir in the cream and chives, and season with salt and pepper.

09 February 2011

Almond Torte

This is a great dessert and I have pretty much convinced myself that is is really more of a vitamin than a dessert.  It has very little white flour, instead uses ground almonds.  It is made with 6 eggs,  4 ounces of dark chocolate, a little cream, only a cup of sugar, and a little raspberry jam for fun.  I think it is more like a PowerBar.  OK, that is just rationalization, but I love this recipe none the less.  It's out of one of the more random cookbooks that I own:  The Sopranos Family Cookbook.  Yep, everybody's favorite mob family. Tony and Carmella have chapter and so do Artie Bucco and Paulie Gualtieri.  If you've never watched the show before, the characters like to eat.  A LOT.  They aren't small people, so go figure, they made a cookbook.

Anyway, some notes on this recipe.  The leavening agent for the cake is the egg whites.  It is a little difficult to incorporate the whites into the almond mixture all at once without deflating the whites.  I would recommend just adding a scoop or two of the egg whites to the almond mixture and combining.  Don't worry about being gentle with it,  all you want to do is lighten up the almond mix.  Then, once it is combined, add the remaining egg whites and fold in.  Here is a good link on how to fold egg whites into a thinker base, although, it is at the 17 minute point in the video, so unless you want to learn how to make a full souffle, fast forward to 17:00.  But all that being said.  Folding will help you keep the cake light.

Also, I'm sure you could use any sort of jam for the filling.  I'm sure strawberry would be good, or even apricot.  Just make sure, whatever you buy, that it is seedless.  I haven't done this yet, but I bet a little bit of Chambord would be delicious in the frosting.  Now I'm just brainstorming.  Have fun with it!

Almond Torte
Serves 8
Printable recipe

2 c blanched almonds
1 c sugar
2 Tbsp all-purpose flour
1/2 tsp baking powder
1/2 tsp salt
6 large eggs, separated, at room temperature
1 tsp vanilla extract
1/2 tsp almond extract
1/2 c seedless raspberry jam
4 oz semisweet or bittersweet chocolate
1/2 c heavy cream
Sliced or slivered almonds for decoration

Preheat the oven to 350F.  Butter 2 9-inch layer cake pans.  Line the pans with circles of parchment paper.  Butter the paper and sprinkle the pans with flour.  Tap out excess.

In a food processor or blender, combine the almonds and 1/4 c of the sugar.  Grind the nuts very fine.  Blend in the flour, baking powder, and salt.
In the large bowl of an electric mixer, beat the egg yolks until thick and light.  Beat in the remaining 3/4 c sugar and the extracts.  Stir in the almond mixture.

In a clean bowl with clean beaters, whip the egg whites until soft peaks form.  Add one big scoop of egg whites to the almond/egg yolk mixture.  Stir in to lighten up the mixture (no need to be gentle here, just mix it in).  Then gently fold the remaining whites into the almond mixture with a rubber spatula.

Scrape the batter into the prepared pans.  Bake for 20-25 minutes, or until the cake springs back when touched int he center.  Cool on a wire rack for 10 minutes.  Unmold the cakes and carefully peel off the paper.  Turn the cakes right side up and let cool completely.
Place 4 strips of wax or parchment paper around the edge of a cake plate.  Place one cake layer upside down on the plate.  Spread the jam evenly over the top.
 Place the second cake layer right side up on the first layer.
 
Break up the chocolate in to small pieces.  In a small heatproof bowl set over, not in, a pan of simmering water, melt the chocolate with the heavy cream.
Stir until smooth.  Let the glaze cool slightly.
Pour the glaze onto the top of the cake.  Smooth the top with a metal spatula, allowing some of the chocolate to run down the sides of the cake.
 Then smooth the chocolate over the sides.  Decorate with slivered/sliced almonds (I like to put them around the sides of the cake--it covers up the rough edges I tend to create).  Let set briefly, then remove the paper strips.  Chill briefly to set the chocolate.

14 January 2011

Cassoulet--A French stew

Our January 2011 Challenge comes from Jenni of The Gingered Whisk and Lisa from Parsley, Sage, Desserts and Line Drives. They have challenged the Daring Cooks to learn how to make a confit and use it within the traditional French dish of Cassoulet. They have chosen a traditional recipe from Anthony Bourdain and Michael Ruhlman.  Don't let all the steps fool you, this isn't as difficult as it looks, but there are lots of steps.  And as I learned the hard way, make sure you read the directions well.

First I want to start out with talking about duck confit.  If you've never had it before, I highly recommend trying it.  Confit is actually a means of preserving meat (be it duck, goose, pork, whatever).  It's the preservation method that make is delicious, I think.  Basically the way the meat is preserved is by first salting overnight, then cooking the meat in it's own fat.  That may sound a little off-putting at first, but then think about duck legs roasted in duck fat.  What a combo!  To can it for long preservation, it is then put in whatever vessel is appropriate and submerged entirely in fat and sealed.  If you want to save some effort in this recipe, you could just buy the confit as well.

I will admit, I sometimes do not have enough attention to detail as I should.  This was my main problem in this recipe.  It is a three-day process, so keep that in mind.  The beans require lots of cooking time and water--that's what I ended up messing up...I only cooked them for 30 minutes on the 2nd day.   Then, I forgot to add the cooking water to the cassoulet later.  Result?  You guessed it.  Crunchy beans and no sauce.  I was able to salvage it a little, but most importantly, the duck survived.  I can't even imagine how good this would be if I followed the directions (go figure).  It was still pretty darned tasty, even skipping a few key steps (but I wouldn't recommend it).  I will give it a second chance in the near future, and I think it will definitely be a winner.

So some notes on this recipe...I did not get any pork rind, so I used bacon to line the pan.  I figured bacon makes everything better so this should work.  I also used Cannelini beans, and aside from the above mistake, I think they worked fine.  I used 4 large bratwursts rather than 6 smaller ones.

For your planning purposes, here is an outline of what needs to be done on which day:

Day one (easy)
-Salt duck legs
-soak beans

Day two (most of the work)
-boil beans
-complete confit
-assemble and cook cassoulet

Day three (again, easy)
-cassoulet back into the oven.

Preparation Time:

  • For Duck Confit: 2 Days.
  • First day, 15 minutes.
  • Second Day, 2 hours.
  • For Cassoulet: 3 Days
  • First Day: 10 minutes, if that
  • Second Day: Approximately 3 ½ hours, most of which is oven time
  • Third Day: 1 ½ hours, all oven time

Cassoulet
Cassoulet by Anthony Bourdain and Michael Ruhlman (as featured on the Travel Channel’s “No Reservations”)
Serves 4 - 8
printable version


Ingredients for Duck Confit
  • 4 whole duck legs (leg and thigh), size does not matter
  • sea salt, for the overnight (at least 6-8 hours) dry rub (the amount varies depending on the size of your legs, so just know that you need to have enough on hand for a good coating.)
  • 2 cups/480 ml/450 gm/16 oz duck fat
  • a healthy pinch or grind of black pepper
  • 4 sprigs of fresh thyme
  • 1 sprig of fresh rosemary
  • 1 garlic clove
Day One
Rub the duck legs fairly generously with sea salt, place in the shallow dish, cover with plastic and refrigerate overnight. At all times, keep your work area clean and your ingredients free of contamination - meaning don't allow any other food, like bread crumbs or scraps, to get into your duck, duck fat or confit, as they will make an otherwise nearly non-perishable preparation suddenly perishable.
Day Two
1.Preheat the oven to moderately hot 375ºF/190ºC.
2.Render (melt) the duck fat in the saucepan until clear.
3.After seasoning with the black pepper, place the duck legs in the clean, ovenproof casserole.
4.Nestle the thyme, rosemary and garlic in with the duck legs, and pour the melted duck fat over the legs to just cover.
5. Cover the dish with foil and put in the oven. Cook for about an hour, or until the skin at the "ankle" of each leg pulls away from the "knuckle." The meat should be tender.

6. Allow to cool and then store as is in the refrigerator, sealed under the fat. When you need the confit, you can either warm the whole dish, in which case removing the legs will be easy, or dig them out of the cold fat and scrape off the excess. I highly recommend the former. A nice touch at this point is to twist out the thighbone from the cold confit. Just place one hand on the drumstick, pinioning the leg to the table, and with the other hand, twist out the thighbone, plucking it from the flesh without mangling the thigh meat. Think of someone you hate when you do it.


Ingredients for Cassoulet

  • 5 cups/1200 ml/1100 g/39 oz dried Tarbais beans or white beans such as Great Northern or Cannelini (if you use canned beans be aware that you will need double this amount!)
  • 2 pounds/900 gm fresh pork belly
  • 1 onion, cut into 4 pieces
  • 1 pound/450 gm pork rind
  • 1 bouquet garni (tie together two sprigs parsley, 2 sprigs thyme and one bay leaf)
  • salt and pepper
  • 1/4 cup/60 ml/55 gm duck fat
  • 6 pork sausages
  • 3 onions, thinly sliced
  • 1 garlic clove, thinly sliced
  • 4 confit duck legs
Day One
1.Place the beans in the large bowl and cover with cold water so that there are at least 2 or 3 inches (50mm or 75mm) of water above the top of the beans. Soak overnight. That was hard, right?  (Beans will double in size upon soaking, so use a big bowl!)
Day Two

1. Drain and rinse the beans and place in the large pot.
2. Add the pork belly, the quartered onion, 1/4 pound/115 gm of the pork rind, and the bouquet garni.

3. Cover with water, and bring to a boil. Reduce to a simmer and cook for about 30 minutes. Season with salt and pepper to taste and continue to simmer until the beans are tender, about 30 minutes more.

4. Let cool for 20 minutes, then discard the onion and the bouquet garni.
5. Remove the pork belly, cut it into 2-inch/5-cm squares, and set aside. (If you plan to wait another day before finishing the dish, wait to cut the pork belly until then.)
6. Strain the beans and the rind and set aside, reserving the cooking liquid separately.
7. In the sauté pan, heat all but 1 tablespoon/15 ml/15 gm of the duck fat over medium-high heat until it shimmers and becomes transparent.
8. Carefully add the sausages and brown on all sides.
 9. Remove sausages and set aside, draining on paper towels.
10. In the same pan, over medium-high heat, brown the sliced onions, the garlic and the reserved squares of pork rind from the beans (not the unused pork rind; you'll need that later).

11. Once browned, remove from the heat and transfer to the blender. Add 1 tablespoon//15 ml/15 gm of the remaining duck fat and purée until smooth. Set aside.
12. Preheat the oven to moderate 350ºF/180ºC/gas mark 4.
13.Place the uncooked pork rind in the bottom of a deep ovenproof non-reactive dish. You're looking to line the inside, almost like a pie crust. Arrange all your ingredients in alternating layers, beginning with a layer of beans, then sausages, then more beans, then pork belly, beans, duck confit and finally more beans, adding a dab of the onion and pork rind purée between each layer.
14. Add enough of the bean cooking liquid to just cover the beans, reserving 1 cup/240 ml in the refrigerator for later use.
15. Cook the cassoulet in the oven for 1 hour, then reduce the heat to very slow 250ºF/130ºC/gas mark ½ and cook for another hour.
16. Remove from the oven and allow to cool. Refrigerate overnight.

Day Three

1. Preheat the oven to moderate 350ºF/180ºC/gas mark 4 again.
2. Cook the cassoulet for an hour.
3. Break the crust on the top with the spoon and add 1/4 cup/60 ml of the reserved cooking liquid. (Don't get fancy. Just pile, dab, stack and pile. It doesn't have to be pretty.)
4. Reduce the heat to very slow 250ºF/130ºC/gas mark ½ and continue cooking another 15 minutes, or until screamingly hot through and through. Then serve.